


16 min reading
Local Landing Pages for Better Local SEO
Automating bulk email campaigns with eSputnik containers is one of the most effective ways to cut campaign preparation time without sacrificing content quality. eSputnik smart containers for email automation automatically pull product information from your website, including images, titles, prices, and links. As a result, email marketers spend significantly less time filling emails with content, even for large-scale promotional bulk campaigns.
In this article, we’ll take a detailed look at how to automate email campaigns in eSputnik using smart containers — from basic auto-population to advanced variable mapping and CSS selectors.
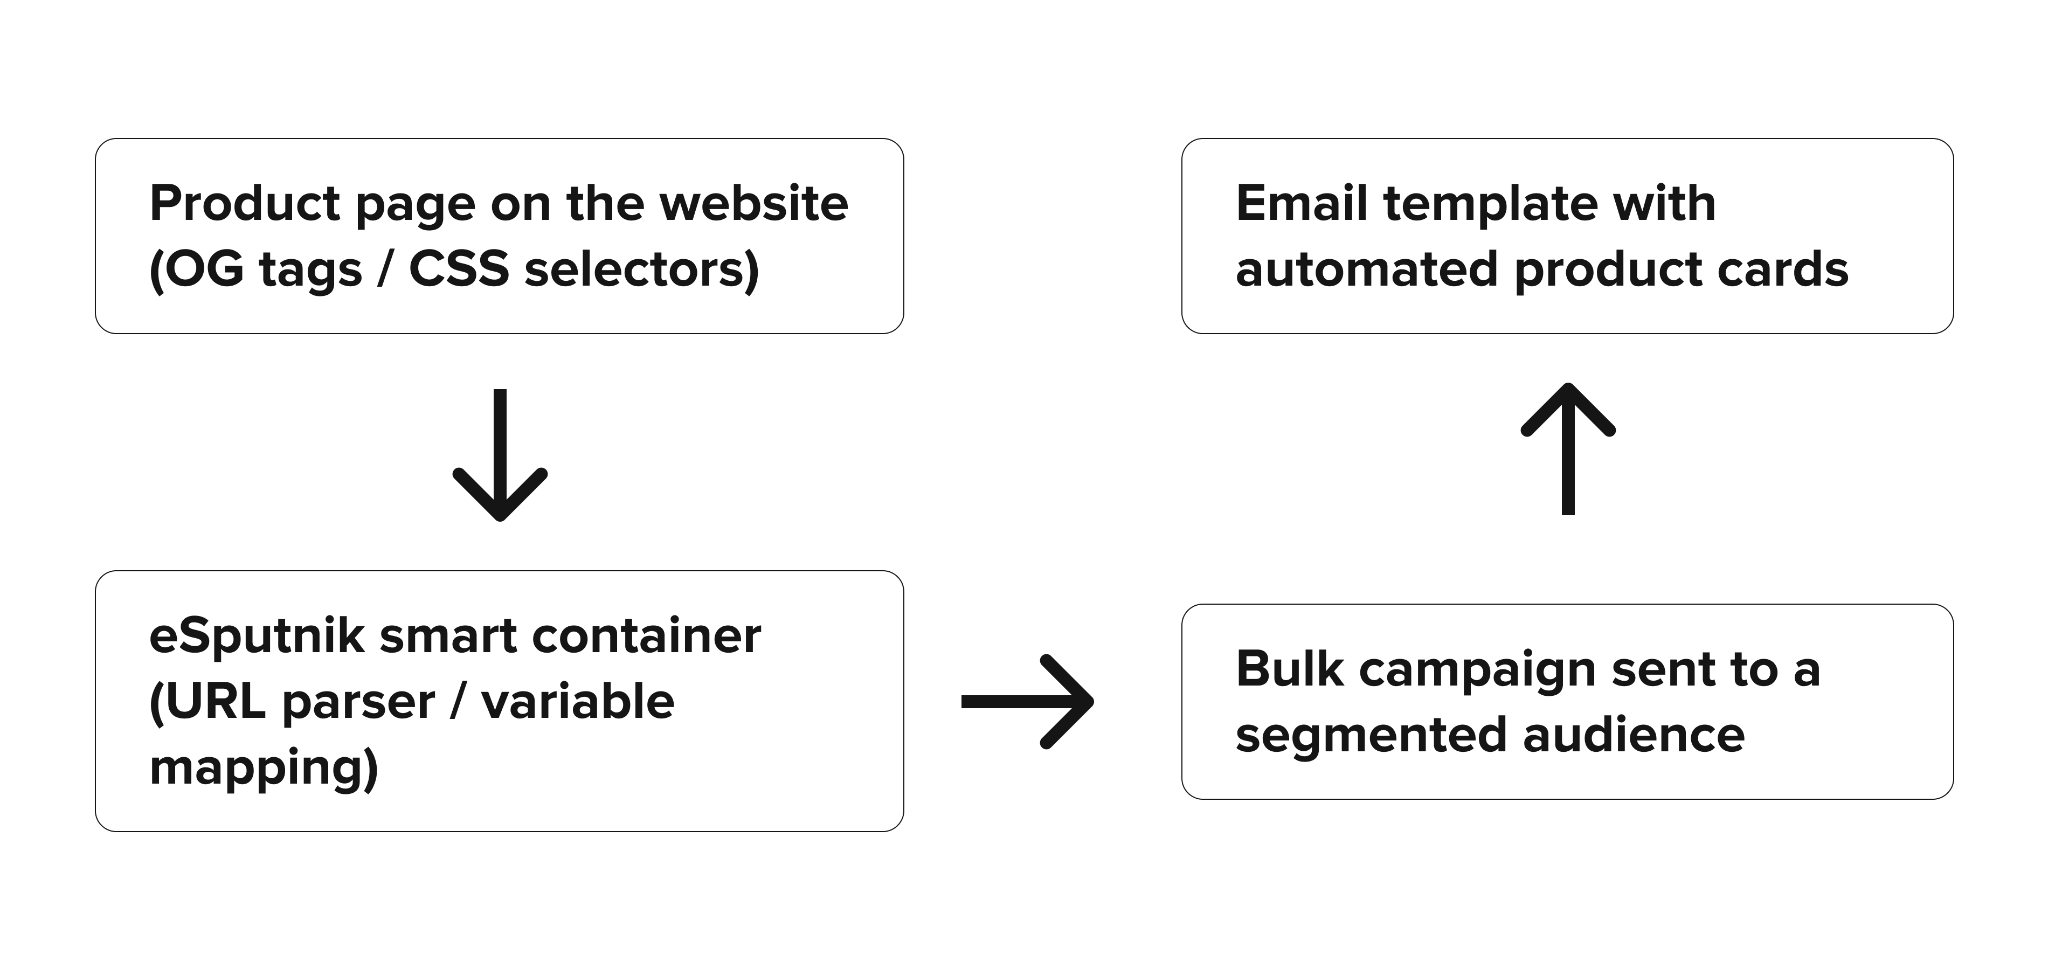
A smart container is a structural element of an email template in eSputnik, composed of basic smart blocks (image, text, button), whose content is automatically filled via data substitution from a product page on your website. Unlike conventional static blocks, where an email marketer manually uploads each image and enters the product name and price, a smart container fetches all the necessary data directly from the product URL.
Static blocks require manual updates for every campaign: if a price changes, you edit it by hand; if a product goes out of stock, you need to make more manual edits. A smart container reads up-to-date data from the website at the time the email is being prepared, which is especially valuable for bulk campaigns featuring dozens of product cards. If the website uses OG (Open Graph) tags that provide structured data about page content, eSputnik automatically substitutes product information into the email template, eliminating the need for manual content entry.
eSputnik containers, which automate dynamic email content, work effectively across a wide range of marketing scenarios. Here are the most common use cases:
Data Flow Diagram:
Before launching the automation of email product cards with eSputnik smart containers, make sure the following technical and organizational requirements are in place.
The larger the product catalog and the more frequent the campaigns, the greater the time savings delivered by smart containers. If you’re sending at least two or three bulk campaigns per month featuring product cards, the automation starts paying off from the very first setup.
This section provides a practical, step-by-step guide to configuring smart containers based on the actual eSputnik interface. Each subsection below represents a distinct step in the setup process. We recommend following them in order, using the accompanying screenshots to navigate the email editor more precisely.
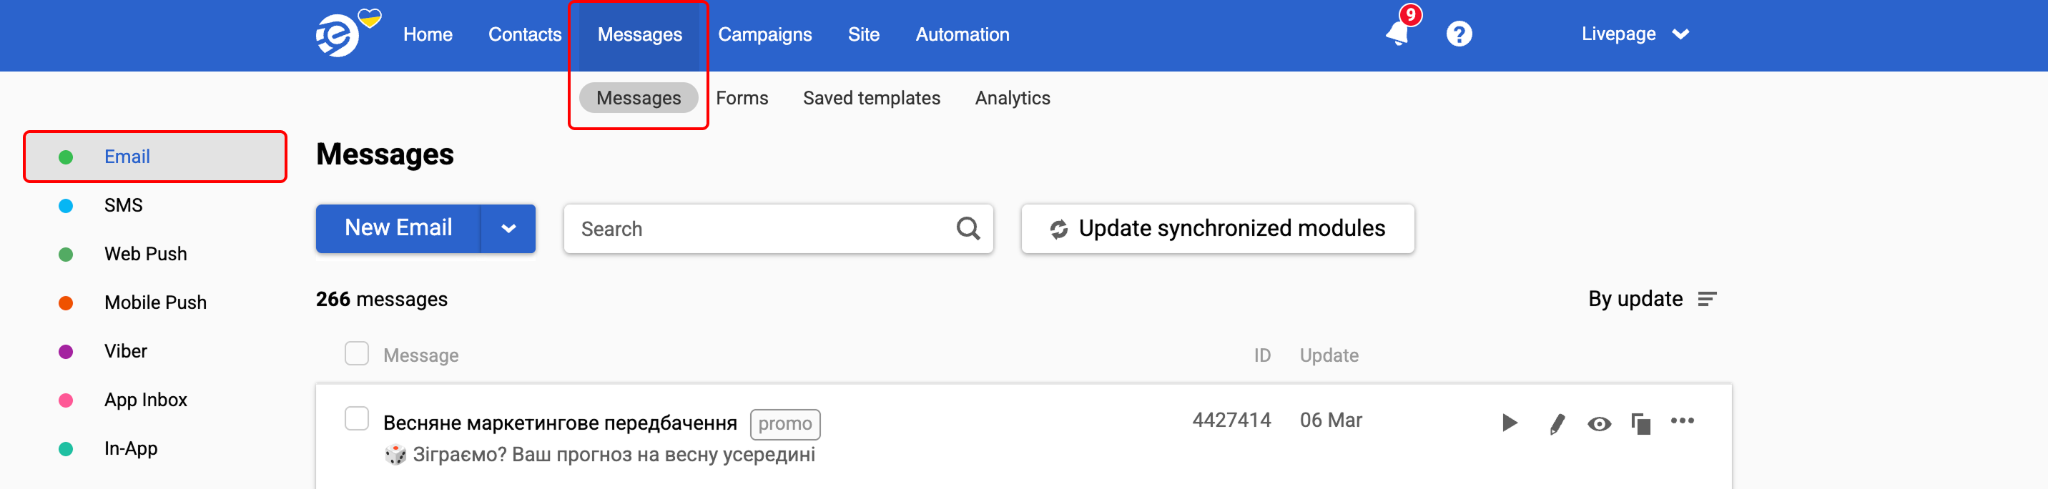
Go to Messages → New Email. Create a new email or open an existing email template to which you want to add product cards.
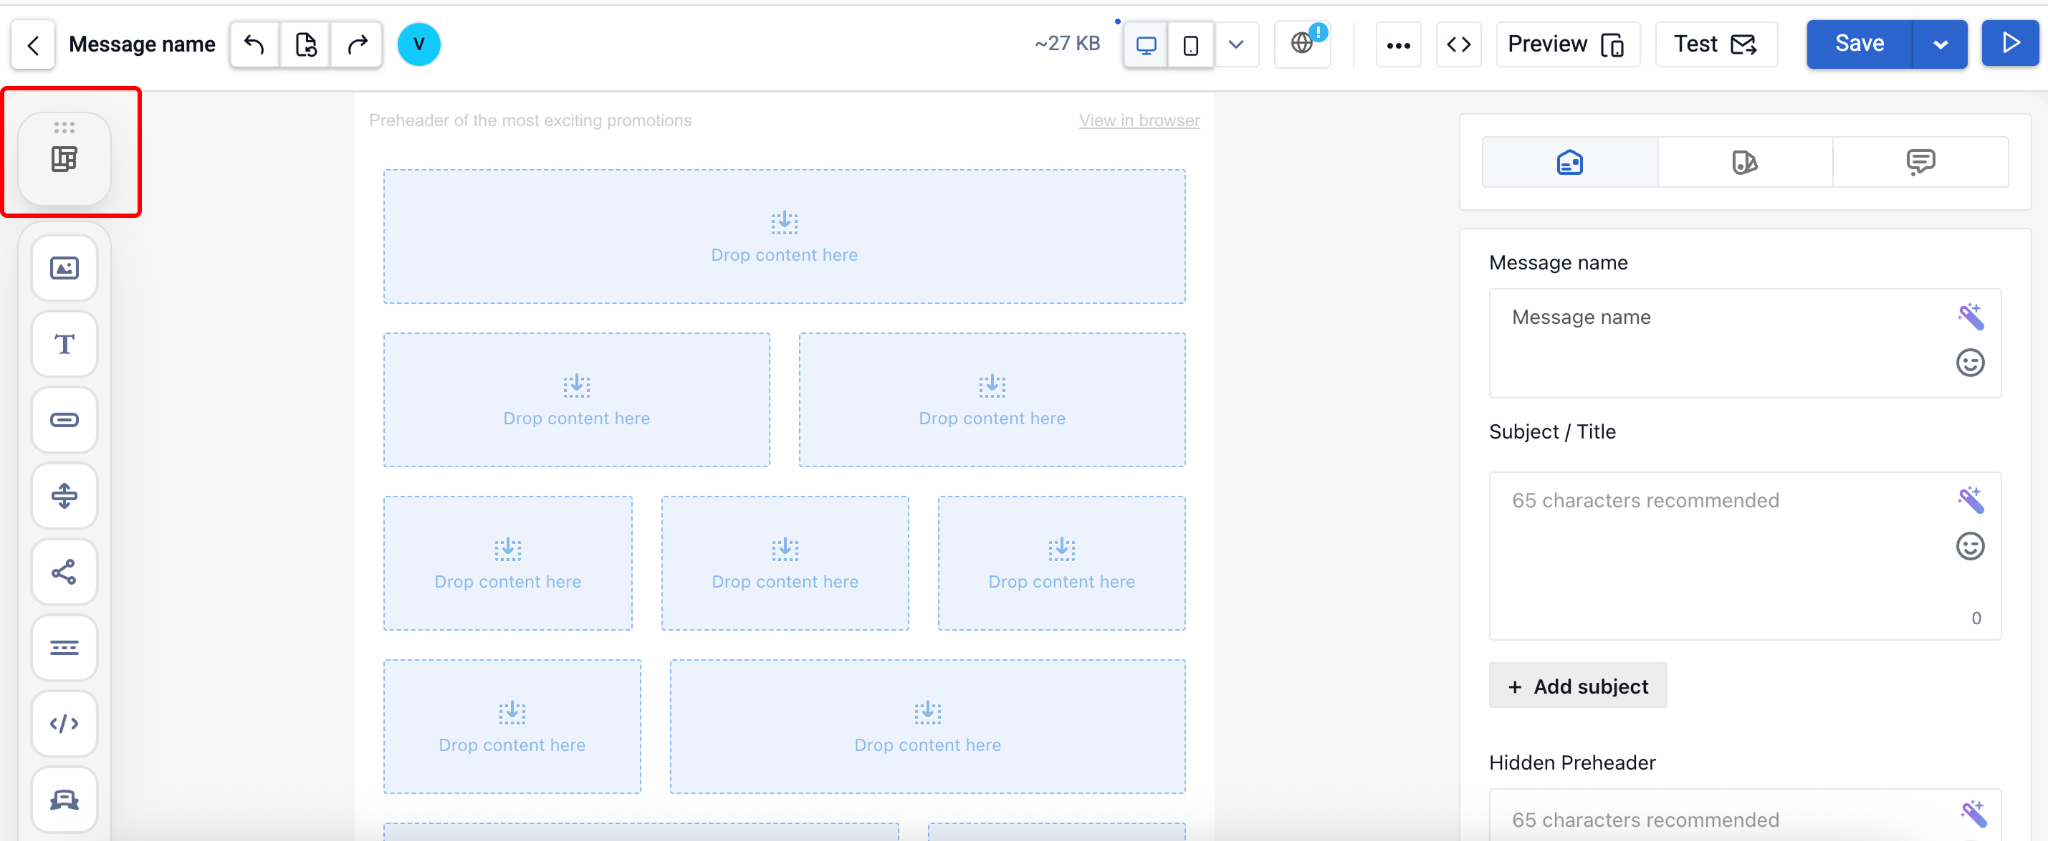
To find and add a product card module:
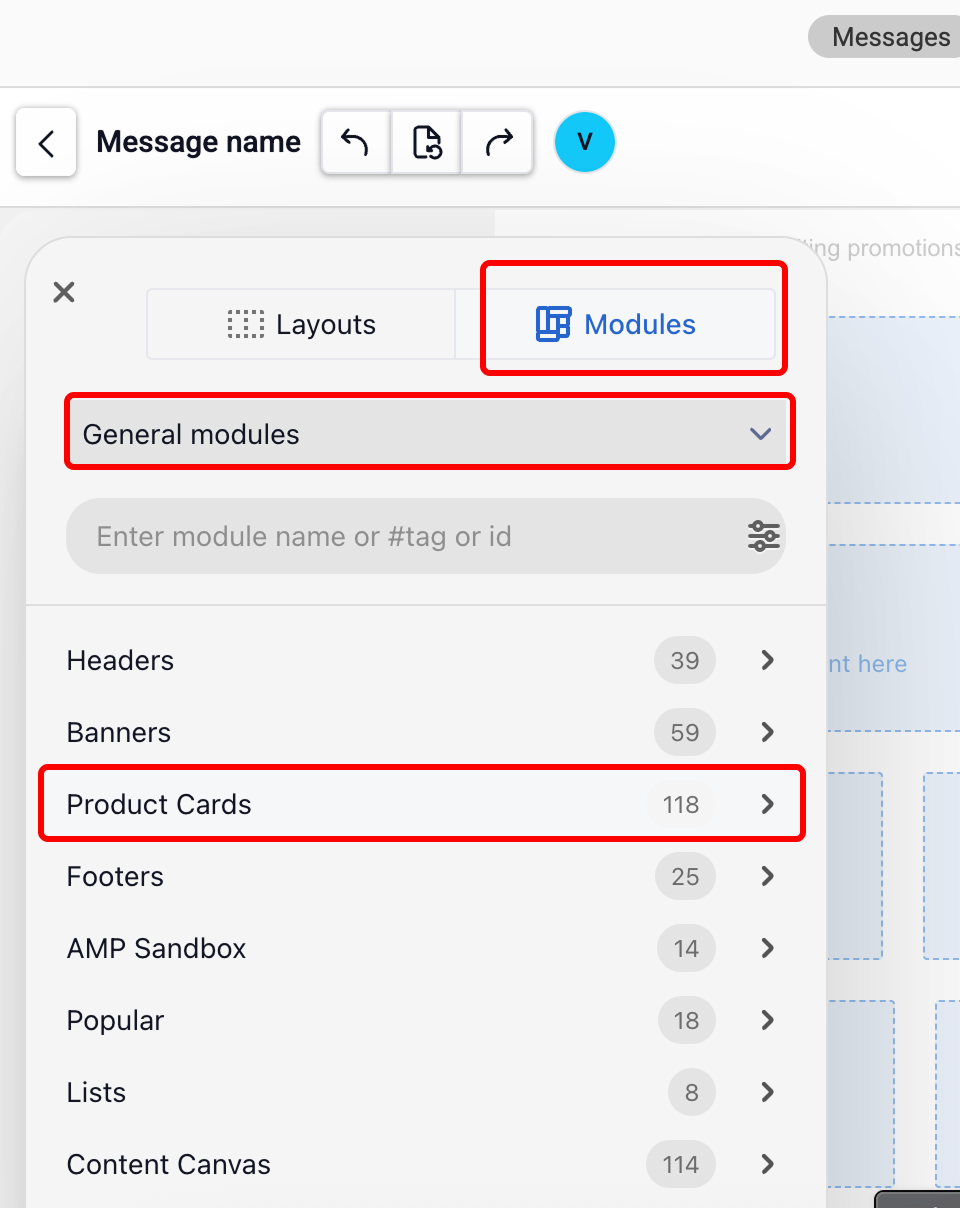
A standard product card contains the following elements:
If the email already has configured visual styles (colors, fonts, spacing), they will be automatically applied to the added module.
Once the module has been added to the template, perform the following steps for each smart container:
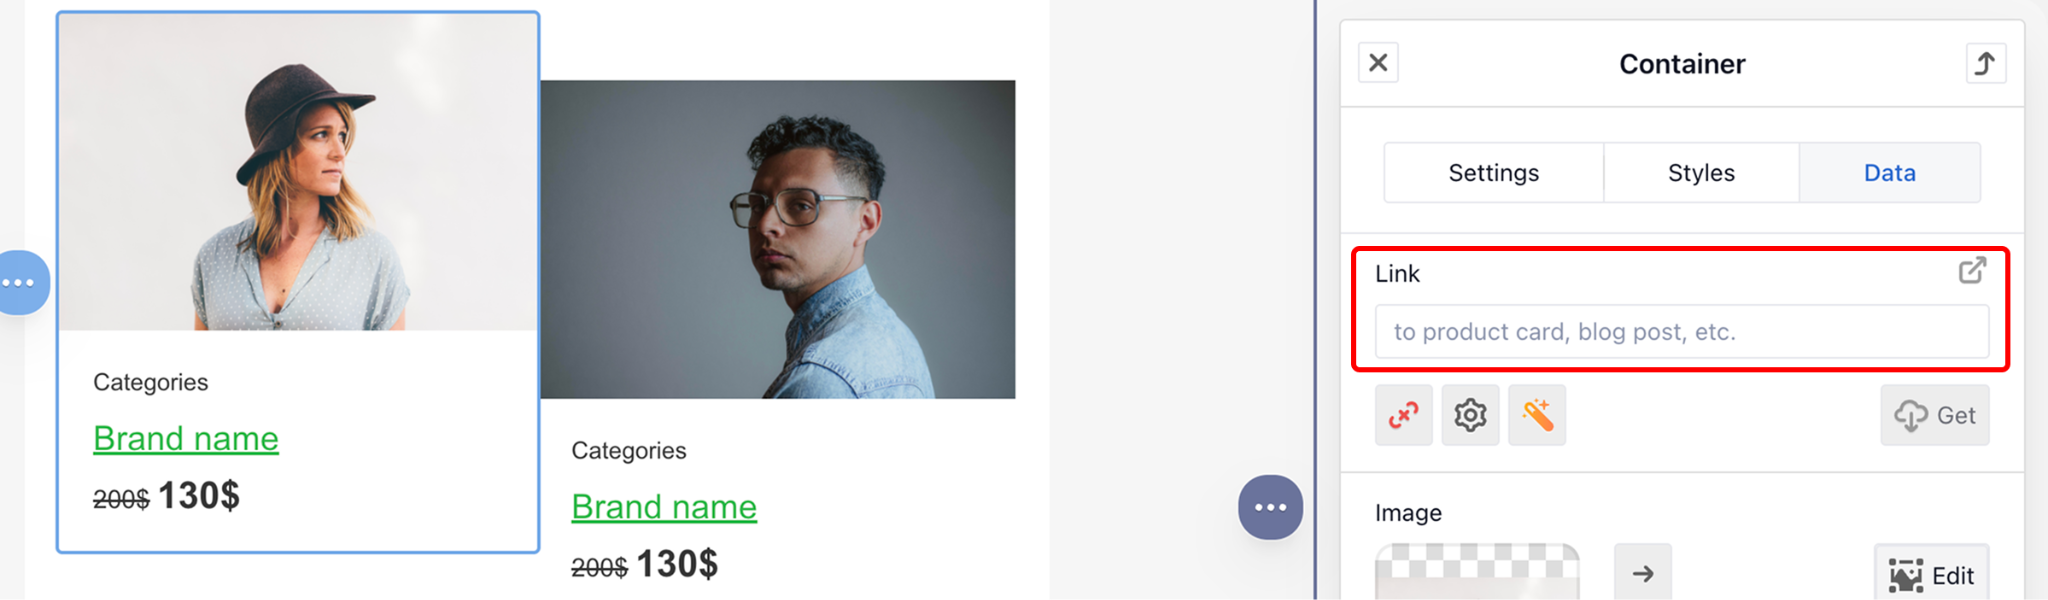
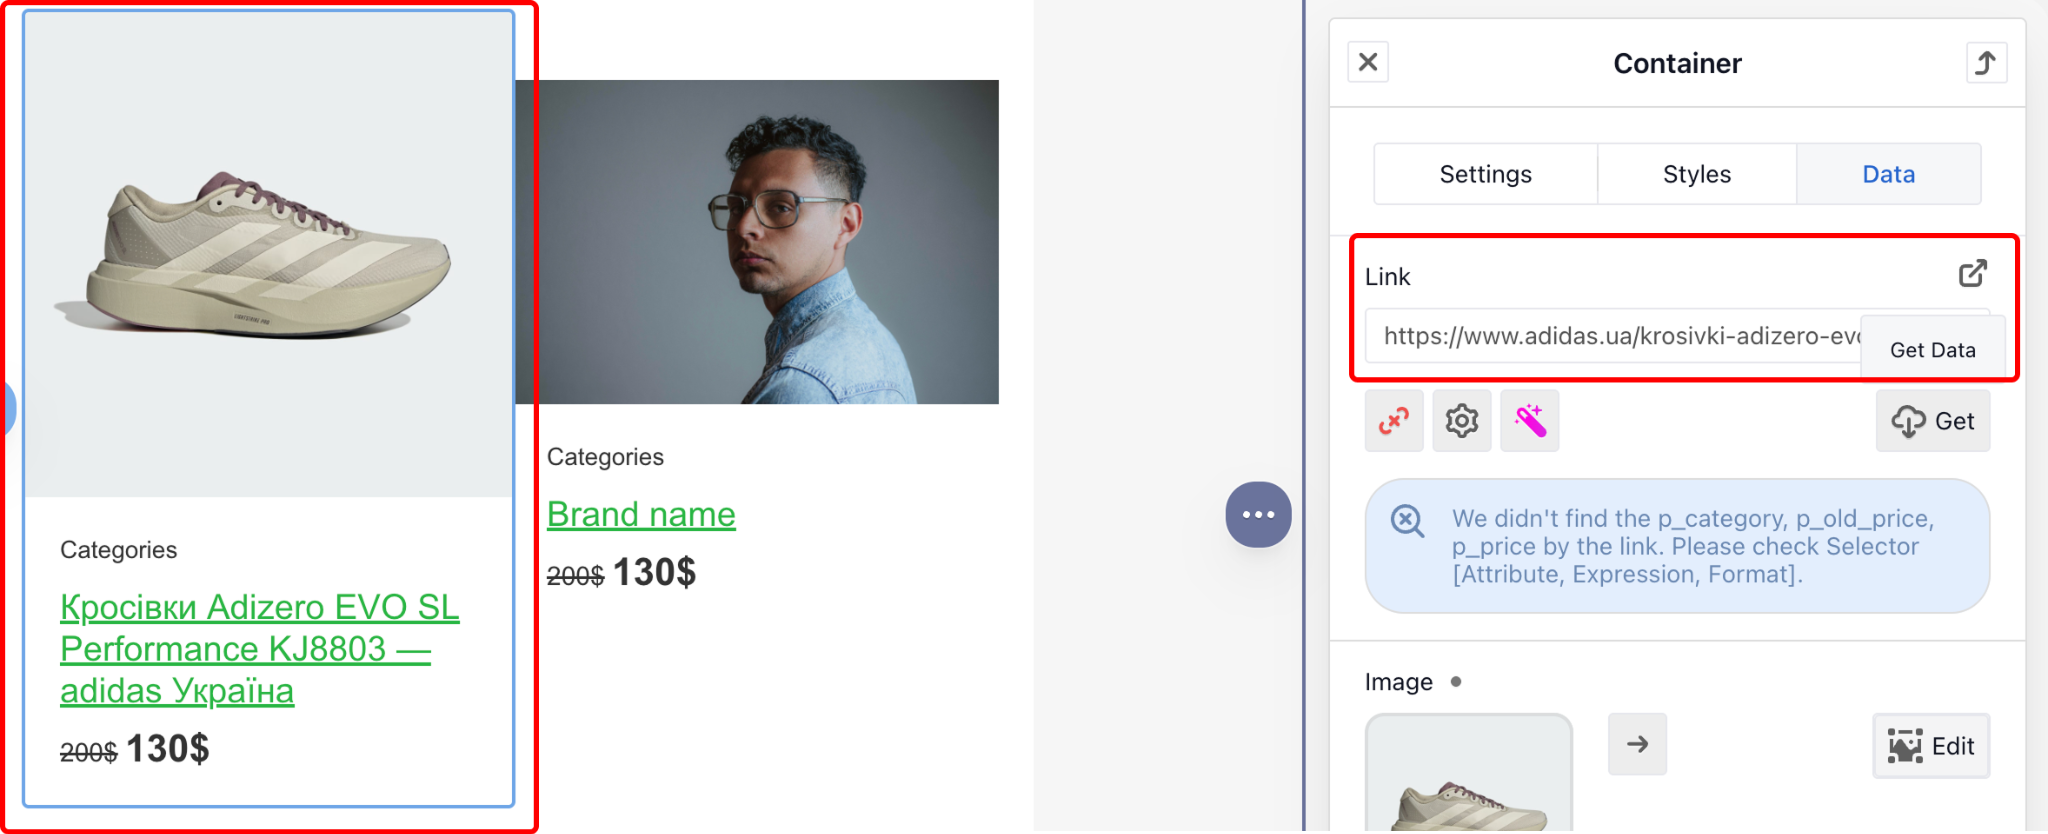
Data automatically filled via the URL parser:
The button text is not updated automatically. If needed, edit it manually after auto-population is complete. Repeat this procedure for each container in the email.
Open Graph (OG) tags are meta markup in a page’s HTML code that communicates structured data to external systems (in this case, eSputnik) about the page’s content: title, image, price, and other parameters. If OG tags are missing or incorrectly filled in, auto-population will either fail entirely or pull incorrect information. Structured data (schema.org) serves as an alternative data source and is also supported by the platform.
Key OG fields that must be present on a product page:
You don’t need deep technical knowledge to check whether OG tags are present and correctly configured on a product page. Simply open DevTools in the browser (Ctrl+Shift+I or F12), navigate to the Elements tab, and search for tags with the attribute property=”og:…”. Free online validators are also an option, such as Facebook’s Open Graph debugger or any OG debug service.

Standard auto-population via OG tags covers the basic fields: image, title, and price. However, for certain product categories or marketing objectives, this may not be enough. In such cases, you can manually configure the display of additional attributes using smart variables and CSS selectors.
Examples of additional parameters worth showing in the email:
The general logic for extending product cards works as follows: a new text block (e.g., a “Discount” block) is added to the product card in the email editor. This block is assigned an HTML class attribute (e.g., class=”Discount”). A corresponding smart variable is then created in the smart container settings and linked to a CSS selector on the website page. When the URL is submitted, eSputnik reads the value of the specified element and substitutes it into the email template block.
Tip: If you need to add several non-standard attributes at once (e.g., a discount and a promotion expiry date), repeat the procedure for each individual block and variable. Avoid trying to fit multiple values into a single smart variable.
This feature serves as the foundation of the variable-mapping mechanism in eSputnik. Each smart variable within a smart container is linked to a specific element on the website page via a CSS selector — a unique “address” of an HTML element on the page. Don’t be put off by the technical terminology. A marketer with no coding background can easily complete this step without additional help.

Simplified variable mapping algorithm:
Important: Most modern websites use standard CSS selectors, so a single smart container configuration will typically work across all pages sharing the same structure. If certain pages use non-standard or dynamic attributes, a separate configuration or a new container will be required.
One of the greatest strengths of eSputnik smart containers is the ability to save configured modules to the module library and reuse them in new bulk campaigns, without reconfiguring everything from scratch each time. A finished module with correctly set up smart variables can be updated or saved as a new email template in the module library with a single click.
eSputnik smart containers are a powerful tool for automating mass email campaigns, enabling marketers to dramatically reduce campaign preparation time without compromising content quality or relevance. By automatically fetching data from the website via OG tags and CSS selectors, an email marketer can build an email featuring dozens of up-to-date product cards, with accurate prices, images, and links, in just a few clicks.
The advanced variable mapping mechanism and support for non-standard attributes via custom CSS selectors open up extensive possibilities for personalization (discounts, promotion deadlines, sizes, availability) that can be automated without developer involvement. And saving modules to the module library allows the entire approach to scale across the email channel: configure once, reuse across hundreds of bulk campaigns.
Ready to set up automating bulk email campaigns with eSputnik containers and finally eliminate manual content entry? The Livepage team will help you work through the technical configuration of smart containers, correctly implement OG tags and CSS selectors, and build a scalable email automation structure that runs without constant marketer involvement.
Smart containers have no impact on deliverability in and of themselves — they are a layout element of the email, not a technical sending parameter. The core deliverability factors remain unchanged: sender domain reputation, the presence of DKIM/SPF/DMARC signatures, subscriber list quality, and engagement metrics (opens, clicks). However, note that if a smart container fetches images from a slow or unreliable hosting provider, it may increase email load time. It is recommended to ensure that product images are hosted on a fast CDN and are accessible without restrictions.
Yes, and this is one of the most effective ways to use them. Smart containers integrate seamlessly with eSputnik’s trigger-based scenarios: abandoned cart, browse abandonment, and personalized email recommendations. In trigger emails, product URLs are dynamically substituted from event data (for example, parameters from events tracking viewed or carted products), and the smart container automatically assembles product cards tailored to each individual recipient. The combination of segmentation, triggers, and smart containers enables truly personalized emails at scale — every subscriber sees exactly the product they browsed or left behind in their cart.


“Livepage has proven to be a reliable source for rapid online growth. We started with 2,000 visitors per month. In 3 years together with Livepage we have reached 70,000 visitors and more than 100 leads from the site per month.”


“As for the results, we’ve been working together since 2015, and our traffic has increased 10x. I cannot say that Livepage was our first SEO company, but they have become the first SEO partner that helped us to achieve the success we were looking for.”

“Livepage delivers SEO efforts that have led to an increase in the site’s users, traffic, and conversions. The team uses a wide range of tools to achieve the client’s goals. They are attentive to the client’s needs, working with them in real-time and bringing in additional specialists when needed.”


“I am pleased with the quick task execution and the instant replies to my messages.”


“I like the complex approach that the Livepage team offers. Absolutely all team members work together; everyone is aware of what is happening on the project. We have one common goal – to increase our service sales, and the team is making every effort to achieve the goal as soon as possible.”


“We’ve been really impressed by how Livepage quickly understood our business and centred our PPC campaign around our objectives. We have achieved good results within a very short time in both revenue and ROI.”


“Everything is clear, timely, and understandable.”


“They have leveraged ideal opportunities to reach our business goals.”
